Showing posts with label sewing pattern. Show all posts

Monday, March 3, 2014

Flat cutting, easy fitting


The table of contents of the ‘The Metric Pattern Cutting for Women’s Wear’ book says:

“Part two: Flat cutting. (Cutting flat shapes for casual and jersey garments)

Well, frankly, I thought that all patterns for all garments are cut flat. Just because you have a flat piece of fabric laid on the table to cut. Apparently, the author of the book has something different in mind.

Then there are chapters:

“9   Easy fitting garments (woven fabrics)
10   Basic and easy fitting garments (jersey and knitted fabrics)
11   Close fitting garments (stretch and jersey fabrics)”

I think Chapter 10 and Chapter 11 are exactly what I need. But first – what actually is ‘cutting flat shapes’ and ‘easy fitting garments’?

There is an answer in the introduction to this chapter: “flat cutting without using dart shaping or close fitting waist shaping”. OK, so it’s easy fitting for a designer, not for the customer. Very simple to cut, very cheap to produce, not so nice to wear. 
 
Then the introduction says: “They [the easy fitting pattern blocks] are the base for most sportswear and weatherwear garments, but they can also be used as a means to create innovative shapes.”  If I understand it correctly, sportswear is what in American English is usually referred as activewear; and weatherwear is something to wear to protect oneself from rain, wind and snow on a camping trip. I’m totally OK with such garments to be cut without shaping. Besides, the author of the book says that these ‘flat cutting’ blocks are frequently used for production in sizes S-M-L-X-L etc. instead of smaller increments as for sizes 2-4-6-8 etc. So, these simplified, flat cutting, easy fitting blocks are not so good as a base for custom patterns.

What I do not like is that there are so many everyday garments cut flat and ‘easy fitting’.  As any woman with bra cup size over B knows very well, it’s not a good idea to get rid of bust darts. And I do not like the air balloon on the back, since front and back are cut the same width, but front requires more fabric than back to go around bust. And, in addition, such ‘easy fitting’ style requires deep armholes, not my favorite. 

As for innovative shapes – these may be created starting anywhere, be it any of the basic cutting blocks or just a plain piece of fabric. The key is to be innovative, not what to use as a base.

I didn’t do the block for the woven easy fit garment. What I can see on the diagram in the book is that the armhole is noticeably wider and deeper than in close fitting block; and the sleeve is noticeably wider and sleeve cap is much lower than in close fitting block.

Next step – Chapter 10   Basic and easy fitting garments (jersey and knitted fabrics).

Sleeve pattern RTW


To learn more about pattern drafting I bought a book “Metric Pattern Cutting for Women’s Wear” by Winifred Aldrich, Blackwell publishing, 5th edition, 2008. It’s a textbook used in the UK design schools. I bought the British textbook for one simple reason – I live in metrics. I grew up in Russia, where only metric system is used and I have hard time with American measure units. I constantly translate everything into metrics, inches into centimeters and Fahrenheit into Celsius. It is easier for me to draft in centimeters and then translate the final results than re-calculate everything back and forth. And I believe that the basic principles of pattern drafting are the same for the American and British designers. If there are the differences, they can’t be too big. 

Since this is the book for drafting patterns for the Ready-To-Wear (RTW) garments, the size of the bust dart is given in the table along with the standard measurements. 

So, I set out to draft a pattern according to the standard measurements used by the industry for the size 8 American, or 12 British. The directions for the front and back are very similar to that given in my Russian book and in the “Finally it Fits” book.  But the sleeve is built in a different way.  
First, I have drafted what is called ‘The close fitting bodice block’. It is a very basic pattern block that has only vertical bust dart and back shoulder dart. It doesn’t have side or waist darts. This block is the base for all other tailored patterns. Here is how it looks like:


The next instruction is to measure the armscye with a flexible ruler.  Then the sleeve cap is built based on this measurement and the width of the sleeve is determined by it. Here is what I have as a result:


Then I decided to draft the sleeve for this bodice based on the armhole height, as in my Russian pattern book and in "finally it Fits" book. I measured the average height of the armhole and made a sleeve as directed in the “Finally it Fits” book. Here is a comparison table:


“Metric Pattern Cutting for Women’s Wear”
Finally it Fits
Bust measurement

88 cm (34 in)
88 cm (34 in)
Bicep 28.5 cm (11 ¼ in)

28.5 cm (11 ¼ in)
28.5 cm (11 ¼ in)
Armhole depth
21cm + 0.5 cm (8 ¼ in + 3/16) for ease
Sleeve width
33.8 cm (13 ¼ in)
32 cm (12 in)
Sleeve cap height

5.3 cm (2 in)
15 cm (5 in)
Ease
5.3 cm (2 in)
3.5 cm (1 in)
Sleeve cap to armhole ratio
0.65
0.69


I’m OK with both sleeves. My personal preference would be a little narrower sleeve with higher sleeve cap, but the sleeves are very close in size and both may fit well. Either sleeve will work as a base. The final sleeve pattern will depend on the style of the garment, fabric used, personal preferences, etc.

As we can see the sleeve cap to armhole height ratio is approximately 65 to 70%. We have to remember this range.


Thursday, January 16, 2014

Why?


Why I’m so obsessed with sleeves?
Very simple – my eyes are tired. I see all the sleeve design mistakes on myself, and on other people. And people complain all the time. Sleeves don’t fit; sleeves don’t feel comfortable. And for me, if sleeves are not cut well, the whole look is spoiled.
It is not like all the clothes do have badly designed sleeves, far from it. But a lot. And it doesn’t always depend on the price, or the label. And it’s not only ready-to-wear (RTW from now on), it’s the same with the patterns for home sewing.
Let’s take a look at some pictures. First – from decent to good to perfect. RTW, prices range from $44 to about $1,000.


See, how these sleeves hang? These sleeves have correct width; folds on these sleeves are vertical, parallel to the underarm seam.  On some sleeves there are some diagonal folds, but not too bad, and sometimes it’s difficult to say if the folds are due to the bad cut or to the body position of the model. Pay particular attention to the underarm area, see how beautifully most of these sleeves hang there? 

Now, let's take a look at the bad and ugly:


See all these diagonal folds? See how wide these sleeves are in the bicep area?

And here are good sleeves for home sewing:

See? Different styles, different fabrics, different amount of ease, from different pattern companies. One thing in common - good cut of the sleeve. Wool jacket, denim jacket, jersey, shirt, blouse, doesn't matter. When it's good, it IS good.

And now bad and ugly:

All the same problems - diagonal folds, too wide in the bicep area, bad fit, and these sleeves hang badly. Would you like to sew from these patterns? I won't.

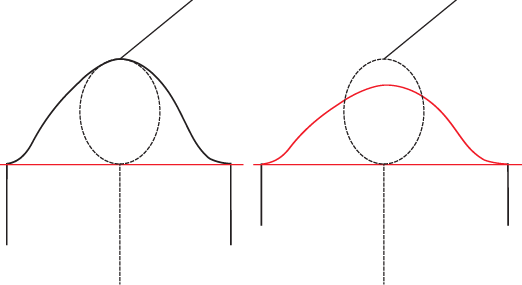
How does it happen? All the problems with badly cut sleeves above are coming from the same source - sleeve cap is too low. Here are schematics:


On the left you see a sleeve schematics with the sleeve cap that has an appropriate height. On the left - the sleeve cap is too low. To be able to set this sleeve in we need to make the sleeve wider, so that the sleeve cap will have the same perimeter length. Note, that we have exactly the same armhole for both sleeves. Then, when you close the armhole and insert the sleeve into it, it'll be like this:

And you'll have to pull the sleeve with short sleeve cap up. The result - ugly folds. Another thing that happens - the angle at which the sleeve is attached to the body of the garment changes. It changes from this:


to this:

Two things do happen then:
1. Since no one goes around with arms outstretched, folds form in the underarm area. True, such sleeve may have wider range of movement, but well  designed sleeve with taller sleeve cap will have good range of movement.  Besides, range of movement depends not only on the width of the sleeve, but also on the depth of the armhole. And it doesn't help if proportion between the two are wrong.
2. If the designer didn't take care to make special sleeve length adjustments (and designers who  are bad enough to design sleeves with caps too low are usually not good enough to do such adjustments) the underarm seam will be too long.

Here is a fine example of such sleeve:


See the folds in the underarm? See how much extra fabric is there? Overarm part of the sleeve has correct length, but underarm seam is way too long.  In my view this sleeve is just plain ugly.

And here is a blouse with wide sleeves designed properly:


No ugly folds, no excess fabric in the bicep and underarm, comfortable width, good range of movement. Just plain perfect.

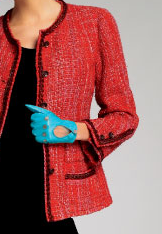
I think Chanel would fire someone who designed this sleeve on spot:

 
And here is a good one:

The problem with all this is that in life bad things have a tendency to become normal. Just one generation of designers who grew up on RTW and we have all these problems with design. One more generation and nobody will even know how clothes are supposed to fit. To keep things going in good way requires constant work against entropy, otherwise it takes over. 


This is why I write this blog.