Sunday, December 29, 2013

Drafting custom sewing patterns


Let’s take a look at the drafting patterns to the individual measurements.
I have two books on this subject – one I have bought in a Russian bookstore when I visited with my friends in Chicago, and the other one is “Finally It Fits”, by Ruth Amiel and Happy Gerhard, published in the US first time in 1973. I have 1976 edition, it is out of print. The Russian book was published in the Soviet Union in 1988, it is a kind of a textbook for middle school home economics class and is very close to what I have been taught in school, but much less than what I had when I took pattern drafting and sewing classes. Both books describe the pattern drafting process in very similar terms, and arrive to very similar results. My personal experience is that these directions for drafting the custom pattern are very good. If measurements were taken accurately, very little corrections are needed during fitting.

The measurements used are a little different. In Russian book to arrive to the armhole depth an elastic tape is put around the neck from behind, then the tape goes to the underarms on front and then around the back at the lowest points of the shoulder blades. To determine the armhole depth you measure from the highest point of the neck where neck connects with the shoulder down the back to the level of the elastic tape. 

In American book they measure from the waist to the armpit on the place of the side seam.
Then the pattern for the very basic sheath dress is drafted. First pattern for the back is built, then for the front. It looks like this, with the skirt front and back overlapping, so we can draw the armhole as one curve:

The side seam is moved toward the back, but it may be positioned at the middle of the armhole. 

Next the pattern for the sleeve is drafted. For the sleeve we need to determine the height of the sleeve cap.
First, let’s see the instructions in the Russian book. We are instructed to connect the shoulder points of the pattern with a straight line; then divide this line in half and square down to the armhole depth line. This is the pattern armhole depth, Measure it on the pattern. The sleeve cap height is armhole depth minus 2.5 cm (1 in). 
 In the “Finally It Fits” book we are instructed to square down from the back shoulder point to the armhole depth line and measure this distance on the pattern. Then square down from the front shoulder point to the armhole depth line and measure this distance. Then calculate the sleeve cap height: add together front and back armhole measurements of the  pattern, subtract 2 inches and divide the result by two.  

The Russian way:


The American way:


Essentially both methods are the same – the average of the front and back armhole depth minus 1 inch. In Russian way we calculate the average by means of geometry; in American way we arrive to the average by means of arithmetic: (ab+cd-2):2=(ab + cd):2 -1”.  

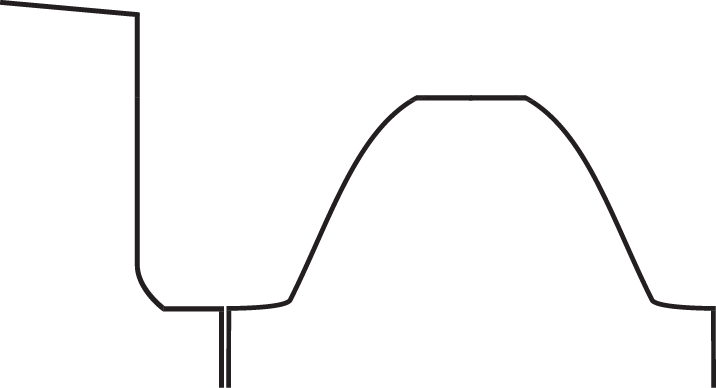
If we apply this reasoning to the simplified knitting diagram we get the sleeve cap height to be the armhole depth minus 1 inch. Since these are directions for the woven fabric, the ease to sew the sleeve cap into armhole is taken into consideration. For hand-knit garments we don’t need ease, we can make the height of the sleeve cap less and estimate it at armhole depth minus 1½ - 2 inches. And this is what I have been always doing.  And I didn’t have any problems with the fit of my hand-knit sleeves.

The standing question remains – Where 3" difference between armhole depth and sleeve cap height comes from? 

I keep asking this question on an assumption that ready-to-wear patterns are drafted basically in the same way as custom patterns, but to the statistically average sets of measurements. So they have to arrive to the same, or very similar, results.


Friday, December 27, 2013

Sewing education.


The next step in my sewing-knitting education was Home Economics class at school. In Russia it was government approved curricula for everything. There were no electives, all classes were required. And home economics was a requirement for girls. For boys there were classes in woodwork, some metalwork, such things. It all started in fifth grade.

I loved it. I was teacher’s pet. I could sew, knit and embroider. Since my school didn’t have cooking facilities (some schools did), we didn’t do any cooking. 

The curriculum was quite intense. I don’t remember everything, but we alternated between sewing and knitting. First, it was an apron, and a garter stitch scarf. Then between sixth and tenth grade we did gathered skirt, knitted hat, shirt blouse, mittens, socks, straight skirt, summer dress without sleeves, sheath dress with sleeves, light unlined jacket. Don’t remember if we did a sweater. 

There was no textbook for this class. The teacher would give instructions; we took notes and followed instructions. We measured each other, then the teacher draw the pattern on the blackboard and we draw our patterns on a huge sheets of graph paper; everybody to her personal measurements. Then we did fittings with the teacher’s help. We learned along the way. There were also a lot of instructions on how to put things together. By the end of high school (tenth grade back in my time) any girl could put together a decent simple skirt or blouse even if she hated sewing. I wore everything I made at school to shreds.

Later, after I finished the university, I decided I want to learn more about pattern drafting. I took classes “for housewives”.  It was four semesters. We met twice a week, at night, after workday, for three hours a night. Once again there were no books available, only tons of instructions from the teacher.  Taking measurements; detailed pattern drafting; how to convert set in sleeve into a raglan, dolman, batwing sleeve; pants, skirts, blouses, everything. How to do collars, pockets, cuffs, buttonholes, etc. And fittings.

It was very demanding. There were a lot of homework assignments and in order to be allowed to move to the next semester all homework had to be done and accepted by the instructor. If one skips classes or doesn’t do homework to the teacher’s satisfaction – the money paid for the class is lost. One can take the class over again, but one would have to pay again. It was no lazy weekends for two years. But I had very good base patterns for myself. Fitted to perfection and I knew how to convert the base pattern into whatever I wanted.

Grandma was very old by this time and couldn’t do much sewing.  I had an opportunity to move out of my parents’ home, and I bought my own sewing machine.  It did zigzag! And buttonholes!  It was a big deal for me.

Unfortunately, I left my notes and patterns behind when we moved to the US.

It's time to think about Grandma.


Every time I’m faced with clothes construction problem I think about Grandma. She was a professional tailor.

Grandma was born in 19th century, in the Jewish quarter of the city of Minsk, the largest city and the capitol of Belorussia.  She went to work at the small women’s made to order fashion shop when she was eight, first swiping the floors, then finishing seams by hand (no zigzag machines, no sergers back then), attaching buttons, and so on. She didn’t put her needle down for the next eighty years. Needless to say Grandma despised ready-to-wear. She could do anything – from mink coat to wedding gown. Her formal education was practically non-existent, but she was voracious reader. 

As it is customary in Russia, we lived together – my parents, my older brother, Grandma and I. I grew up under the sewing machine. I would look for rolled away bobbins, collect pins from the floor, and play with scraps of fabric. Nobody had much concern about pricked fingers; I had access to sharp scissors and hot iron as much as I wanted.

Grandma didn’t do paper patterns. She would spread the fabric on the table and with a scrap of paper with measurements she drew the shape of the pattern on the fabric with chalk. Then there were fittings, long detailed fittings.  I can’t say how many fittings I have witnessed in my life. Women of all shapes and ages. Dresses, skirts, jackets, coats, slacks - you name it.  

Unfortunately, Grandma didn’t explain things to me, most probably because nobody ever explained anything to her. She was taught by praise for what she did right and punishment for what she did wrong.  And she did the same to me. But I went to school, six days a week back then in Russia; I had my school homework and if you think American kids are overloaded with homework you are very much mistaken – in comparison to Russia in my school days they have nothing to do; and I wanted to play with my friends. Now I know that I would be better off finishing seams for Grandma instead of spending my time with neighborhood kids.

I absorbed a lot from Grandma by osmosis. Love for natural fibers. I remember first time Grandma was brought some new synthetic fabric by one customer; it was all rage back then. Grandma felt it between her hands and said “Dreck!” That was it.  She would touch the fabric for a winter coat and say “Cheviot!” with such reverence as if it was Her Majesty the Quinn.  My intuitive understanding of fit. I just see where and how to correct the fit of the clothes, where to let out and where to take in. All these folds and wrinkles just talk to me.  I can press dress pants, well, anything. I know how to work with fur. 

Thank you, Grandma. Thinking about you.

Thursday, December 12, 2013

Getting puzzled.


I took a look at the patterns in knitting magazines. And what I see – in almost all patterns the sleeve cap is shorter than armhole by some 3”. Well, I think, it’s too much difference. It should be some 1.5-2”, but 3”?…


And then I’m asked a question – why sleeve cap is always shorter than armhole? To answer this question, let’s take a look at the sleeve and the armhole. Yes, the sleeve cap is shorter than the armhole, but armhole has to bend over the curve of the sleeve cap and come to the middle of the top flat part of the sleeve. And the perimeter of the front and back armhole parts must be equal the perimeter of the sleeve, since, unlike sewing patterns, when we knit we don’t need ease for the sleeve cap due to the stretch of the knit fabric.


How much shorter? There is a universal answer to such questions – it depends.


It depends on what? 


On number of things – on gauge, on garment style, on garment size. On stitch pattern – garter stitch can absorb a lot of horizontal and vertical inconsistencies; ribbing also has quite a stretch and you can do a sleeve that would be too wide or too narrow in stockinette and be perfectly OK in ribbing. If you want to use some dense stitch pattern, say linen stitch, it’s completely different story, not so much forgiveness here. What to do? How to decide and how to design?


Nowadays when we need to do some research we go to Google. It’s overwhelming, and it’s not enough at the same time. I kept running into the same blogs and the same design advices, and my curiosity was not satisfied. Someone says that vintage patterns usually have higher sleeve caps than contemporary designs. Let’s take a look.


It’s difficult. Instructions are written in completely different way, no schematics. Armholes are usually given in the same way as now – work even until you reach the full armhole height. But sleeve caps – continue to decrease until you have 17 sts remaining. How many rows? Figure it out yourself. And so I do.  I left out patterns with padded shoulders, puffy sleeves, and really oversized patterns. Many vintage patterns are quite difficult, if at all possible to access – no row gauge given; unclear instructions without measurements given; such things. And considering the picture quality of the past, it is difficult to see how sleeve actually fits a human body.


It looks like generally yes, in vintage patterns the sleeve cap/armhole ratio is quite different from what we see today. The sleeve cap/armhole ratio range I obtained is between 53% and 93%. The average is 74%. 
 

In recent knitting magazines I have seen sleeve cap armhole ratio as low as 31%; mostly between 50% and 65% with several exceptions, like 76%; 84% and 92%; the average is 62%. The totally best fitting sleeve had ratio of 74%. 


How did this shift in design happened? I don’t know. Couldn’t find the answer, maybe I don’t know where to look for it.


Well, where to go next? I decide to try to get an answer from professionals – ready-to-wear designers. Ready-to-wear industry employs professional pattern drafters and pattern graders. These people have training, they have access to statistical data on human body measurements, and sophisticated pattern grading software is being developed. And among these professionals there are people who specialize entirely on stretch fabrics.


Armed with a measuring tape and a ruler I head to the mall. I have visited several stores, from Target to Ralf Lauren, and measured knit sweaters in gauge and designs comparable with hand-knit sweaters and in a range of sizes.


Sleeve cap height was easy – just measure overarm measurement, than underarm seam and subtract the second from the first.

Armhole height is trickier. First I would find a horizontal part of the sleeve-body seam. Then I put a ruler at this level perpendicular to the side seam; then I have measured from the ruler to the shoulder.

I have recorded measurements for each sweater separately. At home I have calculated the sleeve cap to armhole ratio. 


Result:  the sleeve cap/armhole ratio across the brands and sizes was between 75% and 83%; average was 77%. 


It piqued my curiosity and I decided to do more research.